
My Projects
3D modeling, texturing, landscaping, and animating
This animation was my final assignment for my Maya course. I was given a pre-rigged character and told to animate a walk cycle, a jump, a take, then a zip off-screen. I think it looks good, and I'm proud of this animation.
This was for a college assignment. I was given a head model and instructed to create additional facial expressions as well as a head with each eye closed. I duplicated the head and used soft select on various vertices to create the expressions. Then, I set up a few sliders that would allow me to blend between the different heads. I also linked each eye to a control object, and then those objects were linked to one big control object, which allowed me to move the objects around, and the eyes would follow. I was also able to move the big control object around, and that would move both eyes at the same time.
This animation was for a college assignment. It was one of my first 3D animations. I built the house, landscape, sign, gnomes, and road. The car and the trees were free models I found on TurboSquid. I built the house by making a single siding panel and then duplicating it multiple times. Then, I took my newly formed wall and built a house with it; I built everything else using basic shapes and Boolean.


The first render is from earlier in the creation process. The animation was going to be set in summer, but I figured if the car was going to spin out on something, snow would make more scenes.
This animation was for a college assignment. I modeled, textured, painted, and rendered all of this. I even voiced the Dreadbot. I used Adobe Audition to add effects to my voice.
To start, we learned how to place reference images we had made into the scene. Next, I built the body by modifying basic shapes, converting them to editable polys, and manipulating the vertices, edges, and faces. To texture the model, I unwrapped it, exported the UV map, and painted the textures in Photoshop. After that, I made the next UV map into a material and placed it on my robot (named Dreadbot), then I added a footstep animation and edited the keyframes to give Dreadbot a stiff, robotic walk.
As for the cannon, I just made a transparent cone and keyframed it to move, grow, and shrink. I used a directional light inside the cannon; I had the light quickly move out and away from the cannon to simulate a bullet or shell firing. I created the burning city by placing lights around the scene, tinting them orange, and keyframing them to flicker. I created the building behind Dreadbot by making a cube, stretching the cube, and Booleaning the windows in. I did add an ember overly to the final project; I thought it helped sell the "City on Fire" look.
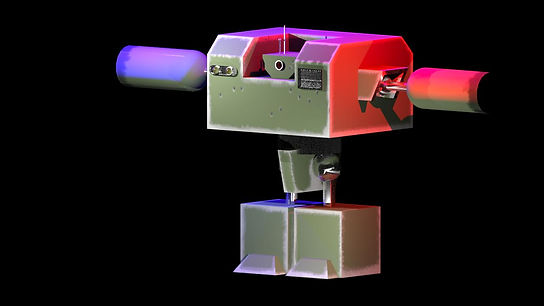
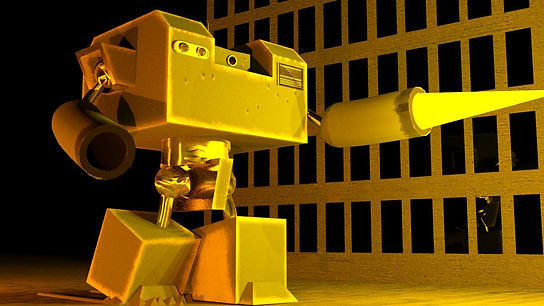


Here are some renders of my Dreadbot model; the two at the top are renders of the finished model, and the lower five are from earlier in the creation process.
This landscape was part of a college assignment. I was taught how to use the various landscaping tools Unreal Engine 5 has to offer. I created this landscape and painted on the various textures. I wanted it to look similar to the mountains seen in the first Jurassic Park. However, I also wanted to include snow, as the mountain looked too simple with just grass and dirt.
Below are a few screenshots of the mountain from different angles.
.png)
.png)
.png)
.png)
.png)
This was for a college assignment; I had to incorporate 3D animation with live-action footage. My instructor said we could use the provided model or make our own. To save time, I used the provided model. We were given an After Effects plug-in that would allow us to export 3D tracking information into 3ds Max. This recreated the camera movement in 3d, allowing us to add a character to the scene. We were told to apply motion capture files to the model. I decided to add a little story to this video; I added a helmet and a gun to the model and had him walk into the road. I wanted it to look like he was stopping a car at a checkpoint. I added the shadow in post.
This animation was for a college assignment. I was tasked with modeling, texturing, and animating a rocket in Maya. I created the rocket by elongating a sphere, adding a cop, deforming the cone, adding cylinders to the bottom, deforming the cylinders, adding another cylinder to the midsection, soft selecting and indenting the cylinder, duplicating the cylinder to create two portholes, and using a Flare and Bend deformer on a cube to create the fins.
For the animation, I created a path using the Bezier Curve tool and had the rocket follow that path. I had the path loop around the planet, pull up for a second, and then gently settle. I used a Squash difformer to add anticipation to the takeoff. The rocket would flip in the wrong direction occasionally, so I had to create a Locator. I set the world up type to Object up and set the Locator as that object. I used keyframes to keep the rocket facing the direction I desired.